In the aviation business, pilots go through a series of tasks at the beginning of every flight. It’s called the preflight checklist and it all happens before the plane ever leaves the tarmac. The idea is to ensure safety and make sure that nothing is accidentally left undone. Other industries could definitely benefit from the checklist mentality, and I consider crowdfunded board games to be among them.
Need help on your board game?
Looking for more resources to help you on your board game design journey?
For my own use, I’ve created something that I call the launch sequence. The launch sequence is a list of things that have to happen in order immediately after the Kickstarter campaign launches. I came up with this idea during the Highways & Byways Kickstarter campaign, and while the campaign itself didn’t work out, I still consider following a launch sequence to be best practice.
For your use today, I’m going to share a generic launch sequence checklist that you can use so you know what to do in the hours immediately after your Kickstarter launches.
First 10 minutes:
Hit the launch button.
Copy the URL.
Set up a redirect link on your website to always go to either a landing page or the campaign.
Tweet the campaign link with a call to action.
Pin the campaign tweet.
Make a Facebook post with the campaign link with a call to action. (Bonus points if you use your personal page as well).
Pin the campaign post.
Post on any other social networks you use.
Ask a few friends to retweet/share your social media posts. This increases visibility quickly, which can help you break through social media noise.
Update your social media bio links.
Next 20 minutes:
Send an email to your mailing list with the campaign link and a clear call to action.
Update the home page of your website with the campaign link and a clear call to action.
Text your family.
Text your friends.
Post the FAQ – which you have hopefully pre-written.
Next 30 minutes:
Send any last-minute press releases.
Monitor and respond to comments and questions.
Update any old Kickstarter campaigns.
Hours after launch:
Post to relevant Facebook groups.
Post to relevant parts of Board Game Geek.
Post to relevant subreddits on Reddit.
This is a generic launch sequence. When you create your own, you’ll invariably add items to this. You might even take some away. For example, my own launch sequence involves immediately posting the Kickstarter campaign link on my Discord server to over 2,000 other game developers. In the past, I’ve also used other large social media accounts and even text message alerts to spread the word. So don’t be afraid to get creative!
Lastly, while this checklist will be wonderful on launch day, if you have time before launching, check out this page to learn more about what goes into launching a game. It’s kind of a lot!
Many of you who read this blog know that I am self-publishing board game designer who uses Kickstarter as my platform of choice for funding the bulk of my projects. Certainly no surprise if you’ve read some of my articles like A Crash Course on Kickstarter for Board Games. Yet I want to make it absolutely clear that Kickstarter is not the only, or even necessarily the best, way for indie board game developers to self-publish their work. It just happens to be the flashiest way to make your dreams come true.
Let’s explore some alternatives to Kickstarter.
Need help on your board game?
Looking for more resources to help you on your board game design journey?
Alternative 1: Go through a Publisher
Self-publishing is attractive. Well, at least it looks that way at a distance, and that’s enough to get naive game designers in the door. As I discussed in Choose Your Own Adventure: Self-Publish or Not, sometimes its best to give up creative control and call in the cavalry. It is hard work to develop a board game and a lot of this hard work has to do with marketing, promotion, bookkeeping, manufacturing, and sales. A publishing company would take care of some or all of that for you, freeing up a lot of your bandwidth and allowing you to focus on other games.
On top of freeing up your time, you might very well end up making more money in the long run. If the publisher sells 10 times what you would have sold and you walk away with a fifth of the profit per game that you would have going solo, you’re twice as well off when it’s all said and done. As far as the expenses that come with getting a game started, namely art and prototyping, there is a good chance the publisher will take care of that for you. In fact, going through a publisher might even be more friendly to new designers. Don’t write it off as an option.
Alternative 2: Traditional Online Product Launch
Let’s suppose you’ve written off going through a publisher as an option. You’re striking it out on your own and you’re going to self-publish. Instead of going to Kickstarter for funds, you get the art, manufacturing, and other setup bills paid by your own equity and/or a traditional bank loan. Though this is expensive, risky, and out-of-reach for many people, it gives you the certainty that your game will exist as a printed, published game.
During the development of the game, you can follow many of the same ideas I’ve expressed in A Crash Course in Board Game Marketing & Promotion. Namely, you can build up a great email list with thousands of people on it. If you do this, you can sell directly to your list through a traditional online product launch. This is how web-based businesses sold products and services prior to the advent of crowdfunding sites such as Kickstarter.
Alternative 3: Focus on Local Distribution
The vast majority of business is done offline. It doesn’t feel that way, but it’s the truth. Turns out those friendly local gaming stores are not simply cool places to hang out, drink coffee, and play board games. They also sell a lot of board games. An entrepreneur could create a board game and sell a few dozen copies to all the gaming stores within a 200 mile radius.
(Can you tell I wrote that paragraph before COVID? The vast majority of business is still done offline, but obviously, follow the safety guidelines!)
From where I live in Chattanooga, there are a number of metropolitan and micropolitan regions that almost certainly have one or more game stores or comic shops. Chattanooga itself, Nashville, Atlanta, Knoxville, plus a bunch of other smaller towns and cities of regional importance that have around 100,000 residents. My region of the country is fairly sparse, too. Try mapping this out with your town. You might be surprised.
When you’ve got a list of local gaming stores, you can walk in or make a call. Talk to people around the store and get to know people. Eventually you may have the pleasure of speaking to the manager about the game that you’re making. They may be very happy to support you in your endeavors if they believe they can sell your game and take a handsome markup.
Alternative 4: Fund on Indiegogo Instead
If you’re really set on crowdfunding your board game project, Kickstarter is not the only crowdfunding platform. Indiegogo also has a pretty healthy tabletop gaming community. While it doesn’t have the powerful name that Kickstarter has, Indiegogo has the distinct advantage of offering creators to take or leave partial funding.
Famously, Kickstarter is all-or-nothing. If you don’t meet your goal, nobody’s cards get charged. This is great because it keeps creators for being on the hook to deliver with insufficient funds and backers don’t end up paying for a hopeless project. On the other hand, though, if you’re okay with receiving partial funding, Indiegogo may be the better option. It’s a very personal choice to make, but it’s one that not enough creators consider.
There is more than one way to see your board game project through to completion. Game development is a long, winding journey, so you want to make sure you consider your alternatives before committing to any one course of action. By taking a long look at the different paths you can take, you’ll be better equipped to make a conscious choice about which direction to travel.
5. Fund on Gamefound Instead
When I first wrote this post back in 2017, Gamefound didn’t exist. There didn’t seem to be a market for a platform like it either.
To fill you in on the news, here’s the idea. Gamefound is a Kickstarter-like platform that specializes in board games. In particular, they make it easier to handle add-ons, stretch goals, and pledge management.
Gamefound has already started seeing some big-ticket campaigns, some of which are raising hundreds of thousands of dollars. There is a very real possibility that Gamefound will continue to compete with Kickstarter in the board game crowdfunding space for years to come.
You might be able to make a good business case for being an early adopter as well! The same crowdfunding principles will apply, but this time, to a platform which caters exclusively to board gamers.
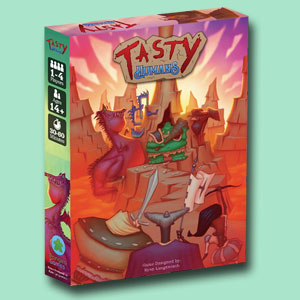
Many of you know that I’m in love with Tabletop Simulator as a testing tool. It’s a simple app on the Steam store, it costs $19.99, and it’s been an extraordinary resource for me during the development of War Co., Highways & Byways, and Tasty Humans.
Need help on your board game?
Looking for more resources to help you on your board game design journey?
The 5 Benefits of Using Tabletop Simulator
I’d like to explain to you exactly how to create a demo of your board game on Tabletop Simulator, but first let’s discuss what I perceive as its five main benefits:
1. It saves you a ton of money and time on prototyping.
Even using simple paper and ink from your printer can add up pretty quickly when you’re making different versions of your game. This can easily add up into the hundreds of dollars, as it did with War Co. for me before I discovered LackeyCCG and eventually Tabletop Sim.
2. It takes less time to create a prototype.
Instead of physically creating a new game or swapping out parts every time you make a substantial change, you can simply update the image files on your Tabletop Sim demo. It’s pretty straightforward.
3. You can play-test online.
This means you can find play-testers all over the world, which allows you to see how well your game communicates with people from different cultures or who don’t speak your language as well. Not to mention, it’s easier for many people to find others online than in person.
4. It’s great for publicity.
Because you can play online, you get the tremendous opportunity to livestream your game with people who have a good size audience on Twitch or YouTube. This is one of the most underrated marketing opportunities around for board game dev. I could easily make two or three articles on livestreaming board games.
5. It makes it easier to build an audience before you have a physical copy of the game.
This goes hand in hand with benefit #4 but bears mention on its own. Until you have something to show people, it’s really hard to get them interested in your board game. Because high-quality physical prototypes can be expensive, Tabletop Simulator gives you the ability to show potential fans what your game is all about without committing to expensive physical prototypes.
How to Make a Tabletop Simulator Demo of Your Board Game
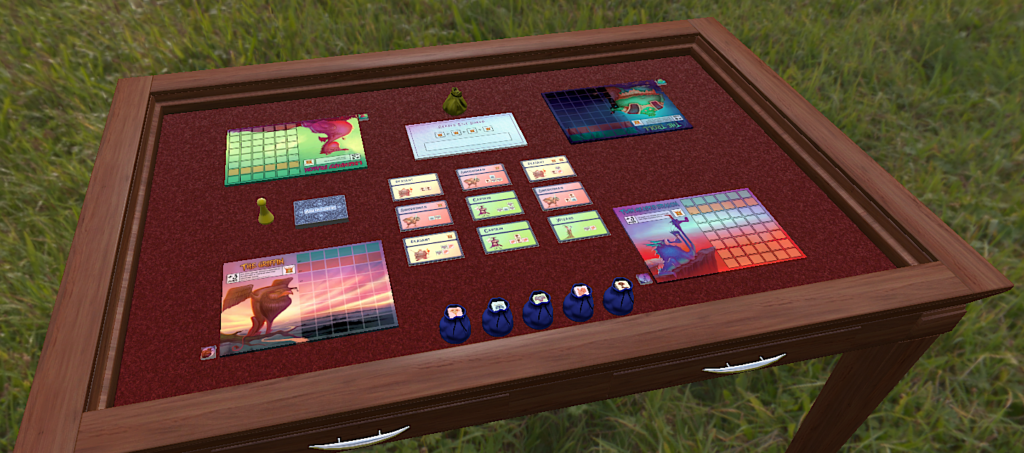
Step One: Create Images of Your Board, Cards, and Components
First, you’ll want to create JPG images of your board and each unique component. If you have duplicates of components, just create a single JPG – you can copy and paste the piece multiple times once you’ve loaded into Tabletop Simulator. This is pretty straightforward – all you need are some files that show what they actually look like. The Tabletop Simulator software will automatically size the board and pieces around your images.
Cards are more complicated. You’ll need to use this template or one similar to it. You’ll need to place the front of each card on one of these numbered slots, starting with 1 and working your way up from there. If you have 50 cards, you’ll fill up the first 50 slots and no others. If you have more than 69 cards, you’ll need to make multiple decks. Once you have all cards placed, save the whole grid as a JPG.
If your cards are a different dimension than the template linked above, you’ll need to create a template that is 10 times the width of a card and 7 times its height. Then you’ll place several gridlines so you get a similar template with different dimensions.
As for the card back, you’ll just need to save that as a JPG. If you have multiple card backs per deck, you’ll need to make another grid based on the template. Card back 1 needs to correspond to card front 1, card back 2 needs to correspond to card front 2, and so on.
Step Two: Upload Your Images to the Internet
Once you have your board, cards, and other pieces ready as JPG files, you need to upload them to the internet. When you’re creating a Tabletop Simulator demo, you’ll need to reference the URL of each image. I suggest you upload files to your own web server, if you have a website. If you don’t have your own web servers, Imgur will do the job.
Step Three: Create a Workshop Item on Tabletop Simulator
Start Tabletop Simulator.
In this order, click Create, Single, Classic, then Custom.
Delete everything from the table by right-clicking each object and clicking Delete. (You can use the default stuff, but I want to show you how to do this the long way.)
In the top middle of the screen, click Objects.
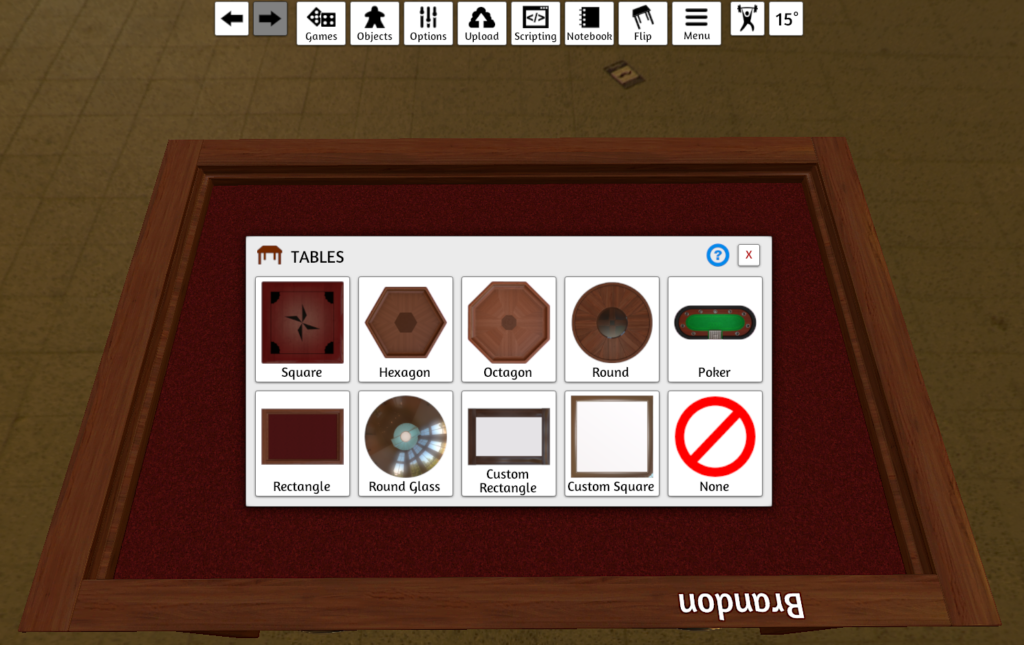
Click Table on the menu.
You should now see a screen similar to the one below where it shows a list of tabletops. Pick one you like.
Now that you have a table, let’s get a board on it.
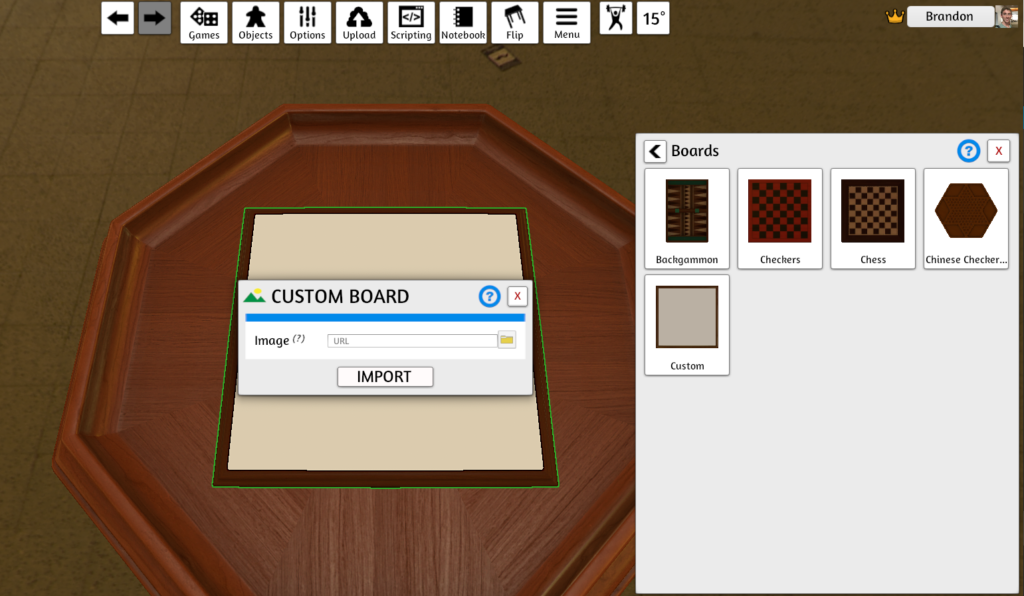
Click Objects in the top middle of the screen.
On the menu that shows up on the right, click Components.
Click Boards and then Custom.
You should see a screen similar to the one below. Copy and paste the URL of your board’s image.
Click Import.
Next, let’s add some cards.
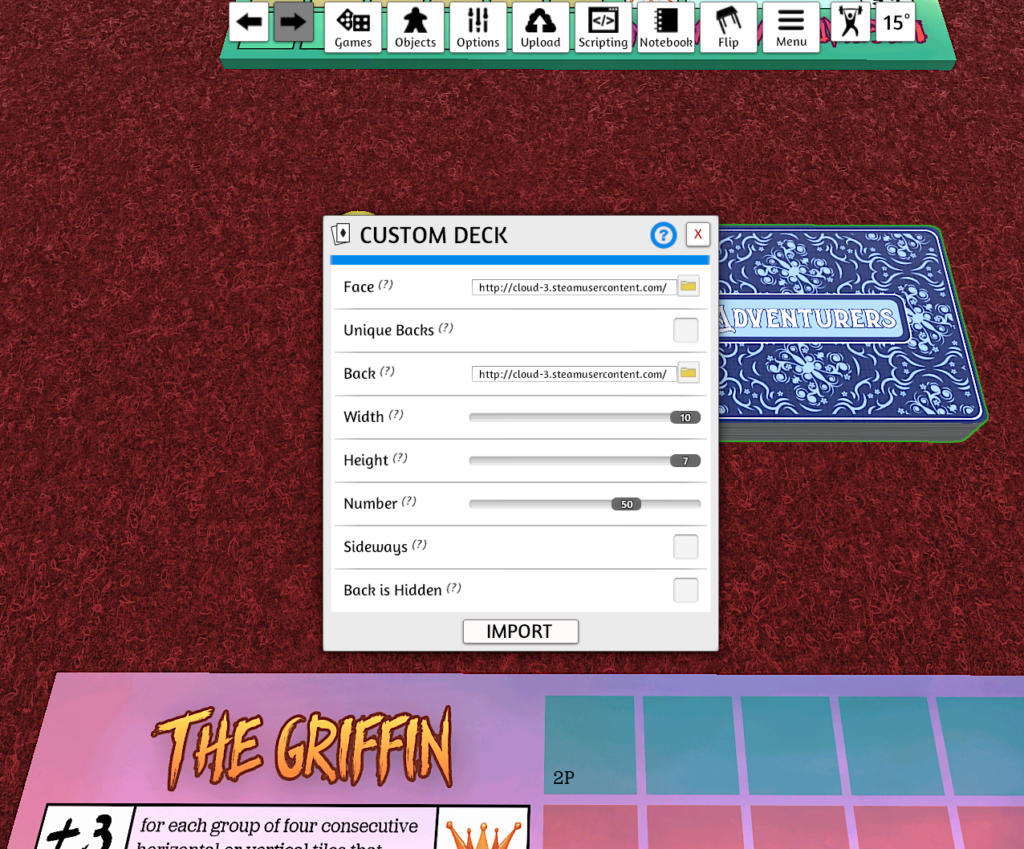
In this order, click Objects, Components,Cards, then Custom Deck.
You should see a prompt like below. Fill it in as follows:
Face – enter the URL of your card fronts template
Unique Backs – check only if each card has a different back
Back – enter the URL of your single card back OR the unique card backs template
Width – 10
Height – 7
Number – number of cards in the deck
Sideways – check only if your cards are meant to be used sideways
Back is Hidden – check
Click Import.
To add a custom component, follow these instructions.
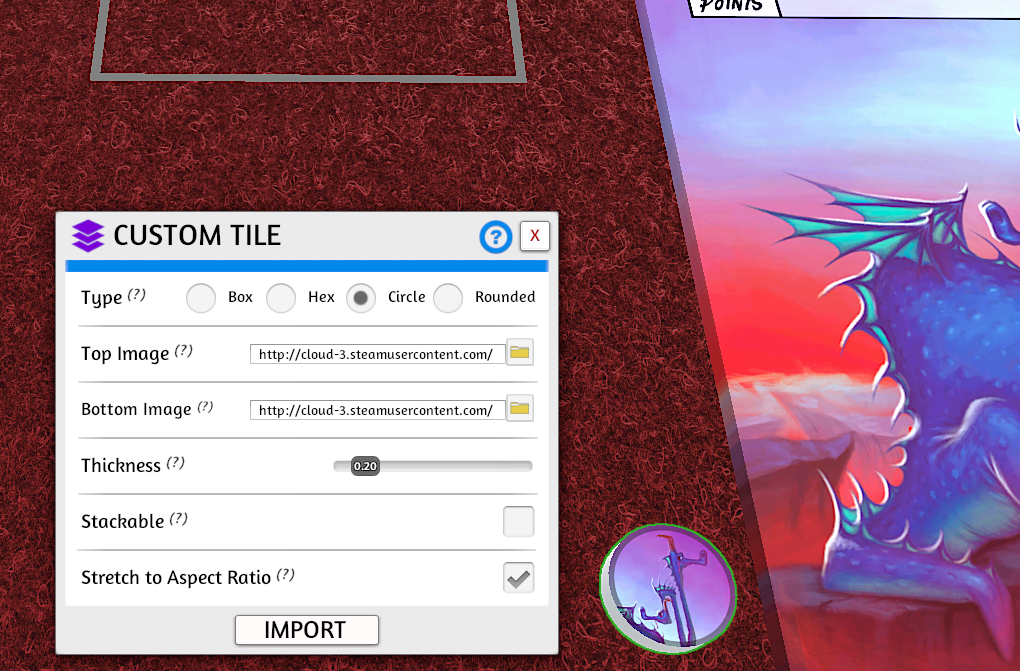
In this order, click Objects, Components, then Custom.
Click Tile for flat pieces or Figurine for stand-up pieces.
You should see a prompt like below. Fill it in as follows:
Type – Box for square, Hex for hexagon, Circle for circle, Rounded for rounded square
Top Image – enter URL
Bottom Image – enter URL
Thickness – 0.20
Stackable – (your choice)
Stretch to Aspect Ratio – (checked)
Click Import.
At this point, you can hover over any individual piece and press the plus or minus key to increase or decrease its size. You can also highlight any pieces you wish to copy and use CTRL+C and CTRL+V to make copies.
Well, let’s not go overboard with copy-paste…
Step Four: Release the Workshop Item
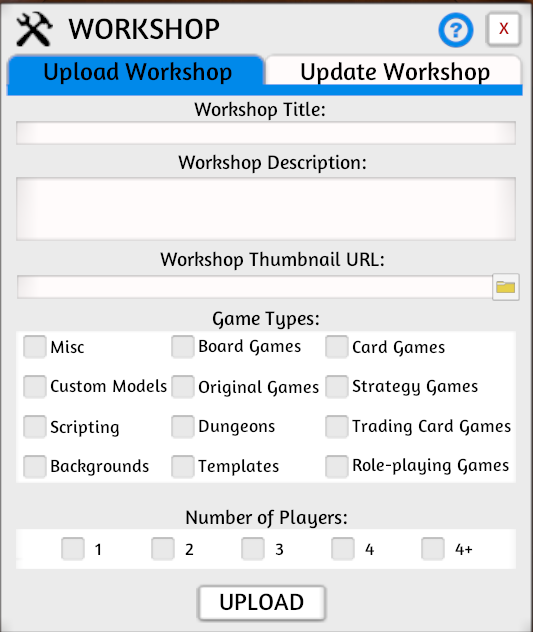
Once you’re done, click Upload > Workshop Upload. Fill out all the information, and click Upload. It will upload it to Steam and then give you a Workshop ID. Any time you want to update your workshop item, pull up this same window and click the Update Workshop tab. Then type in the Workshop ID, fill out the information, and click Update.
Step Five: Get Noticed
If you plan on using Tabletop Simulator for anything other than rapid prototyping, it’s not enough to simply create a Tabletop Simulator demo. After you create the demo, you’ll need to go looking for people who will want to play your game. This can be tricky because not everybody has Tabletop Simulator and oftentimes people are not willing to spend the $19.99 to get it. Think about how you spread your message. Consider reaching out to people who like Tabletop Simulator and play-testing new games on Twitter or in Facebook groups.
Need More Help with Tabletop Simulator?
As you can imagine, with software as sophisticated as Tabletop Simulator, I’ve only been able to scratch the surface of its true abilities in this article. You can create incredibly complex board games with 3D models and Lua scripting. The possibilities are immense.
For that reason, if you need help with Tabletop Simulator, I recommend you check out Overboard Games. The guy behind this company runs the Pangea Games social media, and he’s become really, really talented with Tabletop Simulator. He and his team have even made demos for big publishers such as Stronghold Games, Garphill Games, and Portal Games. He’s worth your time!
Final Thoughts
There you have it! This is a quick and dirty guide on getting started in Tabletop Simulator. Once you understand the basics, you can learn more of the nuanced aspects of creating a demo. I’m just here to help you get started 🙂


