How to Take Pre-Orders when Your Board Game Kickstarter Ends

Posted on 2 CommentsPosted in Start to Finish

Kickstarter campaigns are rapidly becoming the primary means of sales for many board game creators. Even alone, Kickstarter campaigns can be very lucrative, but there is potential to do more afterward. Even if you can’t get your game into physical stores, you can always set up shop online, whether through Amazon or through your own site.
Need help on your board game?
Looking for more resources to help you on your board game design journey?

Today’s focus will be on creating a shopping site that will collect money for pre-orders after your Kickstarter campaign ends. I am specifically referring to taking orders and payment early in exchange for games that you will send shortly after your Kickstarter games are fulfilled. There are five parts to this process:

  1. Setting up an online shop with your products.
  2. Testing the shop.
  3. Integrating the shop with your website.
  4. Directing people from your Kickstarter to your shop.
  5. Adding clear calls to action to push people to your shop.

Setup

For simplicity sake, I’ll teach you how to set up an online shop with the software I use for War Co.: Celery. I use it because the fees are low, the back-end is easy to use, and the interface is pretty slick. That checks all the boxes for me, but I encourage you to do your own research on other e-commerce solutions.

The first thing you will need to do is sign up for an account. Shortly after that, it will ask for your Stripe information so you can accept payments. If you’ve raised funds through Kickstarter, you already have a Stripe account so you will need to retrieve that information to set up Celery.

Shortly after logging in and entering your information, you will get to the main part of Celery. This is where you will set up everything else. The first part of your set up: adding products. Click Products. For each product, you want to add, click Create Product.

On the Products page, you will enter in all of the following information.

  • Basic Info
    • Name
    • Description
    • Image
  • Pricing & Options
    • Limit units total sold (good for inventory)
    • My product has “Only one size, color or material” or “Multiple sizes, colors or materials”
    • Price
    • SKU
    • Charge Taxes – leave this checked!
  • Install on Your Website
    • Publish – check this when you’re ready

Once you’re done, Save & Preview your item. When you’re happy with it, click Save.

After you’ve set up your products, click on Settings. Then click on Checkout.

Fill out the following information.

  • Visual & Appearance
    • Background Color
    • Text Color
    • Button Text
    • Click Save when done
  • Required Fields
    • Shipping address
    • Phone number
  • Optional Fields
    • Allow message from buyer (optional)
    • Message to your buyers
    • Click Save when done
  • Order Processing
    • Lock orders when paid / when fulfilled
  • Confirmation Page
    • Custom Scripts
    • Custom URL
    • Sharing
    • Save each section when done

Click on Payments. Double check everything here. Is your Stripe account set up? Are you collecting the right currency and are you auto-charging orders or manually charging them?

Click on Shipping. Click Create Shipping Rule. For each product, set up Country, Shipping Method, First Item, and Each Additional Item as appropriate. For each Country that does not have an explicit shipping rule, it will be charged the “Rest of the World” rate (which you will also need to set).

Click on Taxes. At this point, you’ll need to refer to your local tax code to do the shipping right. However, the easiest way to get started is to make sure – if you are based in the USA – that you enter the ZIP code where you have a physical presence. That will allow Celery to automatically account for certain taxes.

Click on Notifications. Enter the following:

  • Seller Information
    • Business Name
    • Business Email
    • Click Save
  • Buyer Email Notifications – when buyers will receive emails
    • Order Placed
    • Order Cancelled
    • Order Updated
    • Payment Charge Succeded
    • Payment Charged Failed
    • Payment Refund Succeeded
    • Fulfillment Order Fulfilled
  • Seller Email Notifications – when you will receive emails
    • Order Created
    • Order Cancelled
    • Order Updated

Integrating

Integration can get complicated, but I’ll share the simplest version here. Go to each individual product and scroll down to the Install On Your Website section. For the I want to install as… dropdown box, click “a link I can share.” Then copy and paste the link onto your site. Make sure your product is published first!

Now a word of caution: it’s best to do this on a test version of your website before going live.

Testing

Speaking of testing, you need to act as your own customer. Make sure items show up correctly – they should have the right prices and the right tax rates. Have a friend or a fan make an actual purchase on your system and make sure both they and you get the notifications you should when you should.

Don’t shortcut this!

Redirecting from Kickstarter

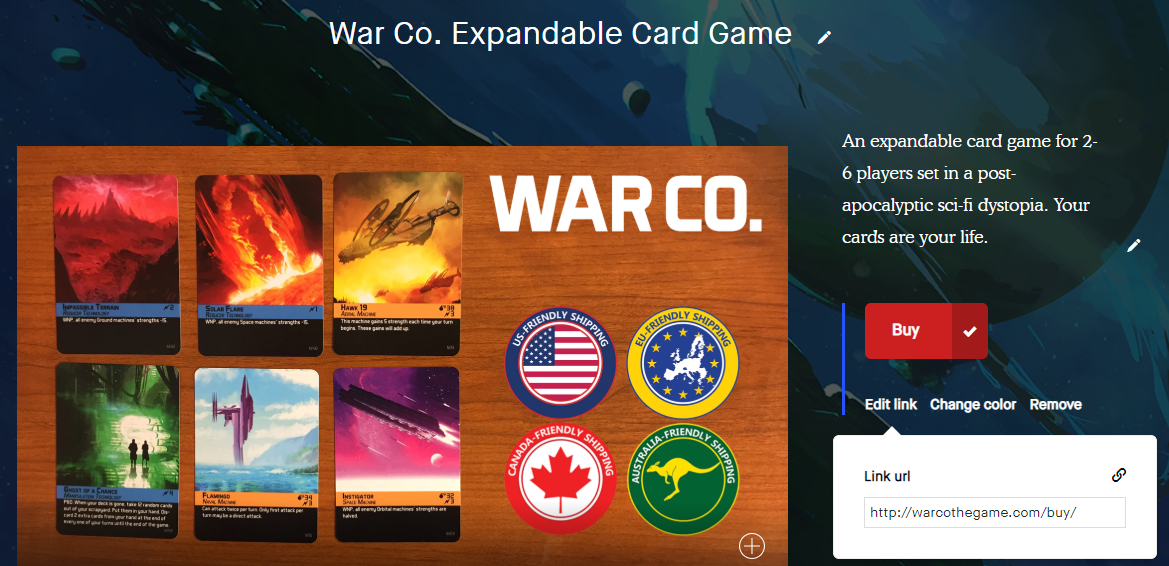
Once you’ve set up your shop and tested it, make sure to set up a call to action on your Kickstarter page. This is easy to do – just go to your campaign page and edit the button on the right side of your campaign picture, as I’ve shown below.
Calls to Action

Don’t forget to set up calls to action on your own website and social media, too. Clearly labeled buttons and well-made product photos go a long way!


Setting up a shop where you can take pre-orders is a straightforward task. Once you do it, you can very smoothly transition from Kickstarter campaign to taking pre-orders, which will allow you to take advantage of the continued spotlight and make a little more money.

Do you have any questions about setting up shop? Ask away in the comments 🙂


How to Keep up Your Board Game Kickstarter’s Timeline after the Campaign

Posted on Leave a commentPosted in Start to Finish

You’ve spent months, if not years, leading up to your Kickstarter campaign. You’ve spent tons of time and effort on brainstorming, developing, testing, marketing, networking, and campaigning. When your Kickstarter successfully funded, it seemed like the apotheosis of your board game career. But with great money, comes great responsibility…

Need help on your board game?
Looking for more resources to help you on your board game design journey?

Where Kickstarters go awry

Before you reach this point, there are a few things you’ll need to do first. I cover these in depth in Kickstarter Math: How to Deliver Your Board Game On-Time and Within Your Budget and How to Order a Print Run for Your Board Game Kickstarter.

For the sake of a simple recap, here’s what you need to know. “A lot of creators get into trouble by giving Kickstarter backers their most optimistic timelines which they are unlikely to meet in even the best of circumstances.” It’s one thing to miss deadlines before your campaign launches. At that point, you’re only making promises to members of your team and fans who would be likely to back you no matter what. After your campaign, though, once people’s hard-earned money has been taken, you’re on the hook to meet deadlines. If there’s one time you shouldn’t slip, it’s after the campaign. (Granted, 84% of people do…)

You have five hurdles to clear after your Kickstarter campaign ends. They are:

  1. The Kickstarter funding payment must clear.
  2. The game must be printed.
  3. The game must be shipped to your warehouses.
  4. Your backers’ orders must be fulfilled.
  5. You must resolve any issues related to fulfillment.

Though all of these hurdles occur after your campaign is funded, you have to forecast how much time they will take before you even start your campaign. You can get these by talking to your printer and your fulfillment companies. Kickstarter funds usually take two weeks to clear, but their policy could change in the future – so always double check!

The five hurdles

The Kickstarter funding payment must clear. You don’t get your funding immediately. Kickstarter takes two weeks to process the payment. You’ll get most of this in a lump sum, and a few people whose cards errored out will correct their information and you’ll get their money late.

The game must be printed. This process often takes well over a month and usually involves asking someone overseas to process extremely technical information with hard-to-use equipment. While many printers are great at their jobs, the amount of things that can go wrong is staggering. Misaligned prints, bad ink coloration, water damage, tears, snags, and unexpected time off. Your game’s not done until it’s done.

The game must be shipped to your warehouses. Of course, it’s not enough to simply manufacture the game. It has to be shipped to warehouses for fulfillment. If your game is heavy or there’s a lot of it, you’ll probably have to ship by sea. This can take a month or two. You might be lucky enough to have a game that you can cost-effectively ship by air. This is faster, but it’s still not immediate.

Your backers’ orders must be fulfilled. Once your game is delivered to your warehouses, they have to process the inventory and get it ready to ship to customers. This can take a couple of weeks. Fulfillment is a complex operation, especially the way third-party fulfillment companies do it.

You must resolve any issues related to fulfillment. Even if you never touch the merchandise, you’re on the hook. You are, after all, the face of the company. Throughout the next few months, you’ll have the occasional dropped package or return. It will be up to you to handle those issues in a timely manner, contacting the appropriate parties as you need to.

You can’t control everything

As you’ve likely noticed by now, most of these things are out of your direct control. You can’t make Kickstarter or the bank release your funds faster. Nor can you print your own game. You can’t steer the boat from China to the US or Europe. For that matter, you probably won’t even end up fulfilling your own game, since it’s usually better to go through a third party. Yet when you encounter problems, you will be accountable. Fun, right?

Most of what you can do has been done by now. You have to be proactive well before you get to this point if you want your campaign to fulfill on time. Even then, you can do everything right and still miss your deadline. Boats get lost. Customs opens random packages and delays their shipping. Printers lose electricity for a few days. Bad things happen.

To some extent, you can prevent delays by adding time to your schedule. Add too much time, though, and it looks like a padded estimate. It’s a delicate balance. Once you reach this stage, your best option may very well be to focus on your next game.


I talk a lot about project management. It is, after all, the backbone of successful Kickstarter campaigns – board games or otherwise. We all want to make amazing games and make people smile. One of the best ways we can do this is simply by keeping our promises. There’s a lot that goes into this, but a little bit of preparation goes a long way. It is on the pillars of pragmatism that we support our dreams.

Good luck on your projects! If you have any questions, feel free to ask below 🙂


How to Keep Up Your Board Game Kickstarter’s Momentum with Stretch Goals

Posted on Leave a commentPosted in Start to Finish

Stretch goals! Everybody who goes to Kickstarter with hopes of publishing their board game desires to not only fund, but to achieve many stretch goals. After all, doing so means you make more money and your game ends up in more people’s hands!

Need help on your board game?
Looking for more resources to help you on your board game design journey?

Why Stretch Goals Matter

The need for stretch goals is threefold. First and foremost, stretch goals help keep attention on your project. Kickstarter, by its very nature, is most compelling to backers when the fate of the project is on the line. Kickstarter provides, in marketing lingo, an extremely effective call to action. Once you reach your goal, at least some element of this magic goes away. Granted, it’s still time-limited and there’s a cost incentive for backers to back now instead of waiting for your game to be on sale later, but they’re not quite as compelling as the project ceasing to exist without funding. Stretch goals help recapture that magic.

The second and most altruistic reason for stretch goals is that they help you make a better project. As a general rule of thumb, you should focus on the minimum viable product at your Kickstarter funding goal. All the bells and whistles – thicker cards, linen finish, add-ons, bonus components, etc. – should not be required at the funding goal level. The reason for this is that they jack up the per-unit cost to print, making your goal edge toward the unachievably high.

The last reason is that stretch goals motivate more backers to get involved. It’s a weird quirk of psychology that people prefer an extraordinarily polished game with extra bells and whistles when it’s put together piece by piece. That is to say:

  • Game A was funded and hit five stretch goals
  • Game B was funded

If Game A and Game B were the exact same in terms of content and quality, people would prefer Game A. It sounds more impressive. It’s a matter of framing. No, it’s not necessarily rational.

Picking Stretch Goals

Knowing specifically what stretch goals are for helps us to determine what the best ones are and how to implement them. Before you choose which stretch goals to pursue and promise, you need to do some research. You need to make sure you are able to fulfill your promises from an operational perspective. It’s true that as you gain more funding, your per-unit cost will go down…but never make assumptions with no intention to test them! Talk to your printer while you’re still developing your game and see how much various component upgrades and add-ons cost. Make sure to account for the shipping weight too.

If you’re adding elements to your game through stretch goals, you need to make sure they are thoroughly play-tested. You need to make sure there are no breakdowns in your rules. Blind play-test your stretch goals. Make sure the balance is right. Confirm that you don’t need additional art that you can’t get in a timely manner. Know that your extra game elements can fit in the box and that they won’t drive up the price to an unacceptable level.

With an understanding of why you use stretch goals and how you can implement them, the only question remains is: what exactly do you choose? Short answer: I can’t tell you that. I can’t tell you that because trends change, and popular stretch goals are always in flux. I’m writing this in 2018, and if I tell you what to do specifically, it probably won’t last to 2020.

An Evergreen Method for Picking Stretch Goals

I refer you then to a method I’d mentioned in a prior article on creating Kickstarter campaign pages.

No guide can ever detail exactly what the optimal Kickstarter [stretch goals look] like because people’s expectations are fluid and best practices change. The campaign pages that got funded in 2015 don’t necessarily look like the ones that will fund in 2018. No matter when you’re reading this, whether it be 2018 or 2038, you need to look at ten pages that funded. Ideally, you want to look at the pages of highly funded games for campaigns whose games resemble your specific niche – sci-fi, worker placement, etc.

Now with that said, here are some stretch goal angles that you can pursue that have stood the test of time:

  • Component upgrades are always welcome. Gamers will hardly balk at nicer card stock, a linen finish, or more components.
  • Extra player upgrades are also popular. These tend to be flashier than component upgrades.
  • Likewise, solo player modes are very popular as well. One of the biggest trends in board gaming right now is the rise of solo player games. Giving your game a solo player mode is a good way to get gamers on your side.
  • Add-ons. Sometimes, you just can’t get everything you want in the base game. If you find there is enough demand, you can always release add-ons.

Aspiring to achieve stretch goals is one of the most exciting things about Kickstarting a board game. They keep attention on your project, bring in more backers, and – most importantly – make your game better. Choose ones that you can realistically add from an operational perspective. Follow the trends and make sure you’re appealing to current tastes. Good luck!