
Board game development is a very individual process. Every single developer has different methods for creating their games. This article is the fourteenth of a 19-part suite on board game design and development.
Need help on your board game?
Looking for more resources to help you on your board game design journey?
In this article, I will be talking about how you create instructions that will allow manufacturers to create your game as a physical product. Creating technical specs can be a complicated task. You need to choose the right materials, understand the basics of board game manufacturing, and meet legal and distribution requirements. Once you understand all that and agree on specs with your desired printer, you will then need to make files according to their standards. It’s a lot to take in.

For context, I’d like to carefully define what board game specs are for. When you’re creating a game that prints more than a few copies, you’ll need to ask a special kind of company to manufacture your game. These companies use what’s called offset printing – basically the method by which more than 500 games can be cost-effectively printed. Most of the ones I know of are based in China, so you want to create very, very detailed specifications that you can send to the printers. If your specs are good, you are likely to get a good product in massive quantities for a low price.
As an example, see the Highways & Byways specs in the following paragraphs. I sent these out to a handful of offset printers to receive a quote.
Board Box Specs, 12.5 in. x 10.5 in. x 2 in. (318mm x 267mm x 51mm)
1 Board Box 12.5 in. x 10.5 in. x 2 in. (to fit quad-fold board)
Material: 1.2mm premium white lined chipboard wrapped with 128 gsm art paper
Finish: Water-proof matte laminated smooth finish
Printing: 4C/0C
Board, 24 in. x 20 in. (610mm x 508mm)
Fold: Quad-fold
Material: 1.8mm chipboard wrapped with 128gsm embossed texture art paper
Finish: Water-proof matte laminated smooth finish
Printing: 4C/0C
Rules, A4 Size or similar, 8.27″X11.7″(210.058mmX297.18mm)
8 pages
Saddle-sewn
Material: 78 lb (115 gsm) art paper
Printing: 4C/4C
Finish: Water varnish
Punchboard, 9”x9” (228.6 mm x 228.6mm) with 48 tiles
48: circular, .5” x .5” (12.7 mm x 12.7 mm)
Material: 12pt C1S + 1mm chipboard + 12pt C1S
Finish: Gloss laminated (smooth finish)
Thickness: 2.5mm
Printing: 4C/0C
House Pieces, 4
Purple, 1
Green, 1
Blue, 1
White, 1
Pawns, 4
Purple, 1
Green, 1
Blue, 1
White, 1
129 Poker Size Cards, 2.5” x 3.5” (63mm x 88mm)
Material: 300 gsm blue core card stock
Finish: Matte (smooth finish)
Printing: Fullcolor, both sides
6 Tarot Size Cards, 2.75” x 4.75” (70mm x 121mm)
Material: 300 gsm blue core card stock
Finish: Matte (smooth finish)
Printing: Fullcolor, both sides
Bag or Bags
Determine case-by-case by manufacturer
I need something but I want to see what’s available and cost effective for holding the punchboard tiles, house pieces, and car pieces.
This guide comes in four parts:
- Choosing Materials
- Printing Basics
- Legalese and Distribution
- Preparing Print Files
Choosing Materials
Before you contact any manufacturers, you need to have a good idea of what parts your board game will need. Parts include boxes, cards, boards, tiles, punchout tokens, wooden and plastic pieces, instruction manuals, and more. Imagine your board game as a complete product – when you open the box for the first time, what comes out? Make sure you think of everything!
You can use websites like Board Games Maker, The Game Crafter, and Make Playing Cards to help you get an idea of what materials you will need. These sites also provide good quality prototypes and specs that you can pass on to printers who will do bigger print runs. I do not recommend using these sites for anything other than prototyping.
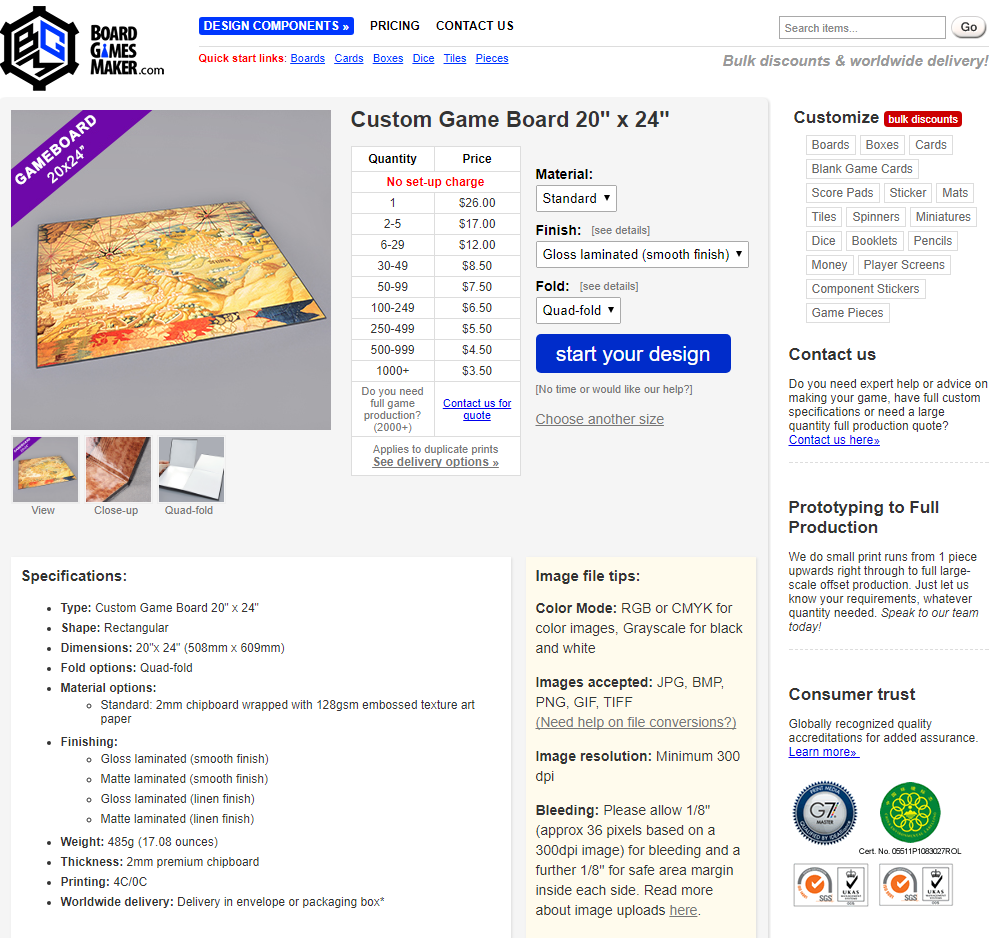
To illustrate my point, I’ve included the above screenshot of Board Games Maker’s website. I used this site to help create Highways & Byways specifications. I selected a board which matches the size I want for my game board. Then I looked at the bottom left where it says Specifications for a lot of useful information, including: dimensions (imperial and metric units), material, finishing, thickness, and printing (4C/0C). Let’s break that down a little bit.
- Dimensions – Every single part you include in your game should have its size specified in both imperial and metric units.
- Material – You can copy and paste this directly to describe what you’re looking for to your printer.
- Finishing – Gloss means shiny, matte is a dull luster. Either one can be pretty, but I went with a matte board so that the gloss finish pieces would stick out more. You can choose between smooth and linen finish as well – linen is nicer, but more expensive, making it a good goal for Kickstarter.
- Thickness – You should always describe thickness of materials to your printer.
- Printing – This describes how many colors will be used on each side. For most cards, it would be 4C/4C – full color on both sides. For this board, since it’s only printed on one side, it’s 4C/0C.
You can use a similar method to find specs for just about any component you can imagine: boxes, cards, boards, tiles, tuckboxes, dice, booklets – you name it. Either Board Games Maker or The Game Crafter will be able to help you find hard specs.
Printing Basics
After you create the initial specs and it’s time to print, you’ll need to make files for your printer to use for printing. This can get really complicated since each manufacturer has their own templates and standards. They’re pretty similar, though. I’ll tell you what I know to help save you time.
When you’re creating files for printers, there are a few constant rules that you always need to follow:
Always use 300 dpi resolution or higher. Any less than that and you run the risk of getting fuzzy images and low-quality printing. It’s not pretty.
Always use the correct file sizes specified by your printer. Board Games Maker provides pretty good templates that you can use that will work for most printers, but you may need to change some things up by hand.
Always respect the bleed, trim, and safe zones. Anything that you print might print slightly off center if parts of the printing machines are misaligned. Anything in the safe zone on your template will always get printed, the trim line is where it’s supposed to be cut, and the bleed line contains everything that could potentially get printed if the machines are misaligned.
Always use CMYK instead of RGB colors. RGB colors are made for computer screens, CMYK is made for printing. Computers can show more colors than printers can print. There’s a lot of cool physics involved that explain why this is, but I’d have a hard time explaining it on this blog.
Always use rich black instead of true black. Colors in CMYK printing are represented by giving a number to each letter in CMYK: cyan, magenta, yellow, and black (K). You might think that C 0 / M 0 / Y 0 / K 100 would print pure black, but it simply doesn’t. It just comes out as a nasty sort of dark gray. To get true black, you’ll need something like C 40 / M 40 / Y 40 / K 100.
Each number in CMYK essentially represents instructions on how much ink to put on a spot on paper. How much ink goes on each spot is called “ink coverage.” You can make real messes with ink coverage if you’re not careful. If all the numbers in the colors add up to be over 300 (or in some cases lower than that), the ink can run. You need to make sure not to exceed 300% ink coverage for every color in your game.
Legalese and Distribution
While your printer will print more or less anything you give them, there are certain legal and distribution requirements that you will want to meet. Real quick: I’m not a lawyer, so double check everything I say with other sources to make sure you’re getting the most up-to-date and accurate advice.
Barcode: If you create a game that you intend to sell in any kind of store, you need a GS1 UPC-A barcode. You can buy these online for relatively cheap on websites like Buy A Barcode. Always follow reccomended guidelines on the print size of the barcode – if it’s too small, it won’t scan.
Don’t try to go super cheap on barcodes! If you buy one and it’s not actually registered with the barcode regulating organization, GS1, then you might run the risk of your barcode being the same as someone else’s. That could lead to your products getting pulled off online stores or even out of physical stores. It just creates a huge headache for the people handling your logistics.
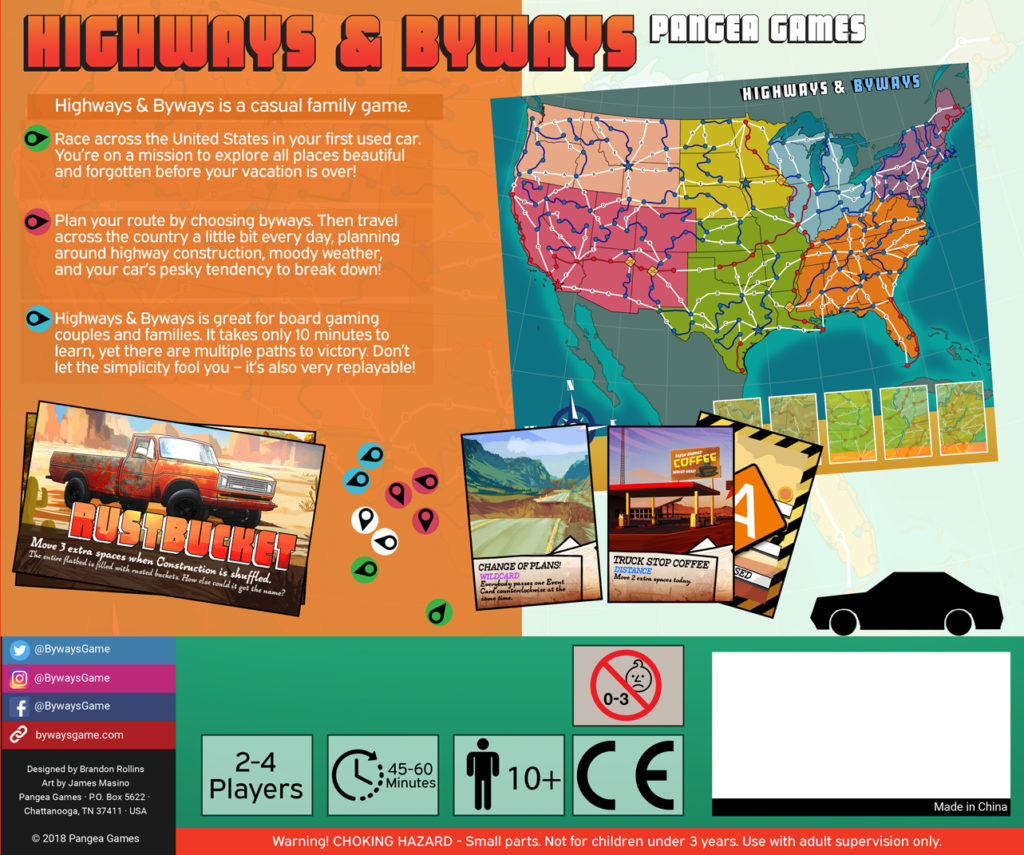
“Made in China”: If you make a game in China, as many do, your box has to say “Made in China” on it somewhere. This is a legal requirement.
Age Restrictions: Have you ever noticed that most modern games have “14+” on the box? There’s a good reason for that. There are special legal requirements that affect games created for children under the age of 14. If your game is truly for children 14 and older, then you won’t have to meet them.
In the case of games for children, but not exceptionally young ones under the age of 4, you’ll need to meet a few additional requirements:
- Your game will need to be safety tested. This costs hundreds of dollars, maybe even a thousand or two for each batch. The cost of meeting international regulations sucks, but not as much as children getting toys with toxic ink or flammable parts. Be a good citizen, get your stuff safety tested if it’s for kids. Otherwise, it can get tied up in customs, or worse.
- Once your game is safety tested, then you can put the “CE” label on the box, which means it’s compliant with relevant European Union standards. (The relevant standards for board games are often EN-71-1, EN-71-2, and EN-71-3, but make sure to do your own homework on this.)
- You’ll need to put a “No 0-3” label to indicate your product is not intended for babies.
- Finally, if your game has small parts, you’ll need to put a “choking hazard” on the box.
All together, that looks a little something like the following image, except with a barcode where there is currently an empty white space. (I haven’t bought the barcode yet.)
Preparing Print Files
Each print file that you prepare for your printer will use a template specifically designed for the components you’re including. I can’t really help you create those templates, you need to find them using the resources I’ve provided. I do, however, have some advice for certain types of components.
For cards, pick a size and find the template on Make Playing Cards. Figure out how many cards are on a sheet and try to print on the fewest sheets possible to decrease cost.
For game boards, figure out where the folds are and adjust art as you need to.
For booklets, choose the number of pages and go with saddle-stitching. You can also get perfect binding, spiral binding, and casewrap binding. However, unless your rulebook is Ulysses by James Joyce, you’ll probably only need saddle-stitched.
When making punchboard pieces, you have to include bleed on each piece. You can’t usually make pieces smaller than 6mm, and even if you could, you probably shouldn’t because they’d get fiddly fast. Punchboards can get expensive, so try to fit everything on one or two boards. Use thicker pieces, like 2.5mm instead of 1.8mm – they are so much easier for players to pick up and use.
For meeples and other pieces, ask your printer what is available. Use The Games Crafter to find the parts you like and ask for ones like that. Providing specific examples makes life easier for your manufacturers.
When it comes to bags and inserts, it’s always nice to include them. Players really appreciate it.
Miniatures require their own 3-D models – I don’t know much about this. I know that the set-up cost is really high, but people are very enthusiastic about miniatures in tabletop games. If you plan on making miniatures, you need to find a good 3-D modeler and prepare for a large print run.
Deciding How Much to Spend
It won’t take you long to realize that the materials that go into your board game will determine the cost to manufacture it. Knowing exactly how much you can afford to spend per unit is difficult, and it’s something I talk about in-depth in this post.
It can be difficult to take the products we imagine in our heads and describe them in enough detail for people halfway around the world to make them a physical reality. It is a necessary skill, however, and I hope that this article has provided you with enough context to get started. If you have any specific questions, please ask below in the comments, I’d love to help 🙂


14 thoughts on “How to Create Board Game Specs and Files for Your Printer”
It’s probably worth mentioning that if you need multiple sheets of punchboard, having identical cuts (or “dies”) will save you money with most printers.
For example, if you need a sheet of square tokens and a sheet of round tokens, you’re better off creating a single “half square, half round” sheet than two separate dies.
Yes absolutely, Peter. This is a big one and can save a new designer quite a bit of money once you multiply it by 1,000+ games ordered for an offset print run.
Could you elaborate on why you wouldn’t recommend Make Playing Cards and the others for anything other than prototypes? Is it a quality thing, bulk pricing, both?
Hi, Darren. There’s a couple of things going on. For one, offset printers are a lot more likely to package all pieces and parts together. It’s mainly cost, though. As a quick example…
Through Make Playing Cards, poker size cards, if you print 500 decks, come to a whopping $4.60 each at 300 gsm and with a custom tuckbox and no other parts. This is not counting shipping, customs, or taxes. The same order for War Co. cost me about $2.25/each in late 2016 through PrintNinja with counters included in each box, customs, and shipping accounted for.
Hey Brandon, would you be able to share at all from your experience how to protect the IP for your game, especially when working with manufactures (China) where you have less legal protection and higher risk of getting your game knocked-off or sold without your knowledge/permission by your manufacturer? This is an area I’d be interested in knowing more about if you haven’t covered it already. Thanks.
You can never be 100% safe when it comes to IP, but there are two things that immediately come to mind:
1. Register online for your copyright, and if applicable, trademark before you get your game printed. Doesn’t take too long and doesn’t cost much, at least not for the copyright.
2. Stick to reputable printers. If you find a random company off Alibaba, that’s a lot different than taking the recommendation of 4 or 5 separate people on BGG.
Hope this helps 🙂
Hi
Always enjoying your wonderful tips! Any tips/steps for putting your prototype game box art physically on a concept game box? Front and back .
I need 12x12x3” for my box but no one has them in stock so I’m buying discounted games with that box size and printing and gluing my art over the entire box… thoughts!
Thx
Hi Brandon, I’m considering buying everything to print it in my own in my garage. I have already a 3d printer and I’m thinking about buying the rest too. To start up and being able to fullfil quality standarts, which printer would you recommend me. I’ve read that UV printer could do it. What’s your opinion on this? Any suggestion? I have a cutting and shrink machine on my list to. Is there anything else I’d need?