How to Build a Mailing List and Send Newsletters as a Board Game Dev

Posted on 6 CommentsPosted in Start to Finish

I’m a big fan of mailing lists. Sending email newsletters to well-targeted mailing lists is one of the best ways you can spread the word of your business and keep customers engaged. I spoke about the value of mailing lists earlier in How to Generate Traffic for Your Board Game Kickstarter or Website, but today I want to dive into the details you need to know to get started. As such, this guide will be split into five parts:

  1. Mailing List Basics
  2. Setting up a Mailing List on MailChimp
  3. Creating a Landing Page that Works
  4. Creating a Template that Works
  5. Building Your Mailing List

Mailing List Basics

Before you create a mailing list, you need to understand how they fit into your marketing strategy. I talk about this in How to Choose & Use a Board Game Marketing Strategy that Works, but I’ll recap the basics here. After people are paying attention and interested in your game or brand, you’ll need someplace for them to go before you ask them to take action. The best places I know to send interested potential customers is to an online community or a mailing list. In fact, I personally use both – providing access to an online community in exchange for an email address.

For you, emails are valuable to have because you can push marketing messages to customers. You can persuade people to read your posts, back your Kickstarter, or buy your game. For customers, this is an easy and passive way to stay in touch. Even better, if you’re putting thought and love into your emails, you can make their lives better by reading them. This is what I try to do – spend about 20-30 minutes every week crafting emails that people want to open.

Another thing you need to do before you create a mailing list is get a P.O. box. Yes, that sounds weird, but you need to hear me out on this. In order to be compliant with anti-spam laws, you need to have your business address at the bottom of every email you send out. This is a legal requirement. Now I don’t know about you, but I’m not interested in putting my home address – which is ██████████ – on the internet for strangers to find. That’s why you get a P.O. box. For folks based in the USA, that’s as simple as going to the post office and saying “I would like a P.O. box” and then paying them $60-or-so every six months.

Who would have guessed you needed a physical mailbox to send emails?
What do all these numbers mean?

Once you set up your mailing list, you’ll become aware of a number of cryptic-sounding metrics that will tell you about the health of your mailing list. Here are some you need to know:

  • Open Rate – the percentage of your mailing list that opens your email. (25% or higher is considered good.)
  • Click Rate – the percentage of your mailing list that clicks on at least one link in your email. (2% or higher is considered good.)
  • Hard Bounce – happens when you send to an invalid email address.
  • Soft Bounce – happens when your email is sent to a valid email address, but they don’t receive the email.
  • Subscribes – the number of people who join your mailing list.
  • Unsubscribes – the number of people who leave your mailing list. (Ideally, this is 1% or lower.)

By far, the most important metric is click rate. It indicates the number of people who are using your emails to get where you want them to go. If your click rate is low, that means you need to work on your call to action. We’ll talk more about calls to action in the template section below.

As with anything, I cannot give you the perfect answers on how to run the right email campaign for your business. All I can do is give you guidelines and examples. You need to go into this with the mindset of a scientist. Always be experimenting. Always be ready to change when the data says that’s the right thing to do.


A Quick Note on Email Marketing Software

At the time I wrote this article initially, MailChimp was the best system on the market. Now it’s one good choice out of many. I’m leaving most of this article untouched, but I’d like for you to know there are a lot of other good email marketing software providers out there. A few examples:


Setting up a Mailing List on MailChimp

There are lots of sites that will help you set up a mailing list, but the one I use is MailChimp and I really like it. This is what I’ll be teaching you to use. Click that link and then click Sign Up Free. Provide an email, username, and password.

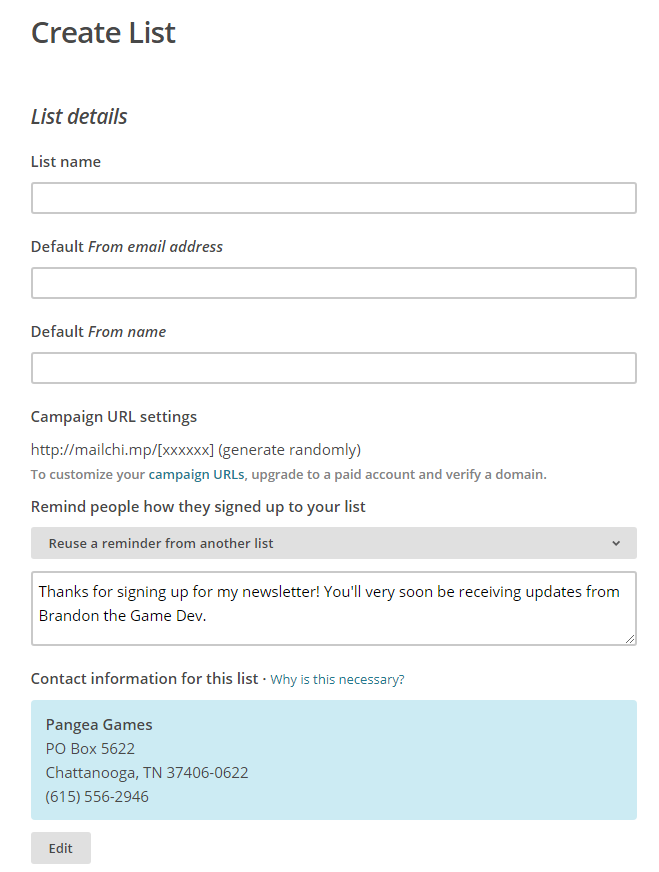
Once you’re logged in, create a list. At the time I’m writing this post, that means clicking Lists then clicking Create List button. You’ll be asked to enter the following:

  • List Name – I use Brandon the Game Dev Newsletter. Short and descriptive.
  • Default From Email Address – I set up one on my web server called no.reply@brandonthegamedev.com. This isn’t hard to do, but it’s out of the scope of this article.
  • Default From Name – I use Brandon Rollins. More personal that way.
  • Remind people how they signed up for your list – I use:
    • Thanks for signing up for my newsletter! You’ll very soon be receiving updates from Brandon the Game Dev.
  • Contact Information – I use my P.O. Box.
  • Enable double opt-in – I leave this unchecked. Otherwise, people have to respond to a confirmation email when they sign up, which lowers sign-up rates.
  • Notifications – I leave all of them unchecked. They get old fast.

Click Save. Then click Settings and click List fields and *|MERGE|* tags. Merge tags are really cool, so you’ll want to pay attention to this. They pull information from your sign-up form and they associate it with each email. For example, when I sign up for a MailChimp campaign, I might see Email Address, First Name, and Last Name. Naturally, I’d enter brandon@pangeagamescompany.com, Brandon, and Rollins respectively. That info is all stored in a database.

Each bit of information is associated with a merge tag.

  • *|EMAIL|* is brandon@pangeagamescompany.com
  • *|FNAME|* is Brandon
  • *|LNAME|* is Rollins

Someone can then write a newsletter that starts out as “Hey *|FNAME|*!” and it will show up as “Hey Brandon!” For my friend Carla, it’d be “Hey Carla!” and for my friend Sean, it’d be “Hey Sean!” This lets you personalize your emails with anything your users provide. You can add more merge tags if you want to customize your emails even more. There is a ton of potential here.

We’re going to stick to the basics today, though, so let’s talk about…

Creating a Landing Page that Works

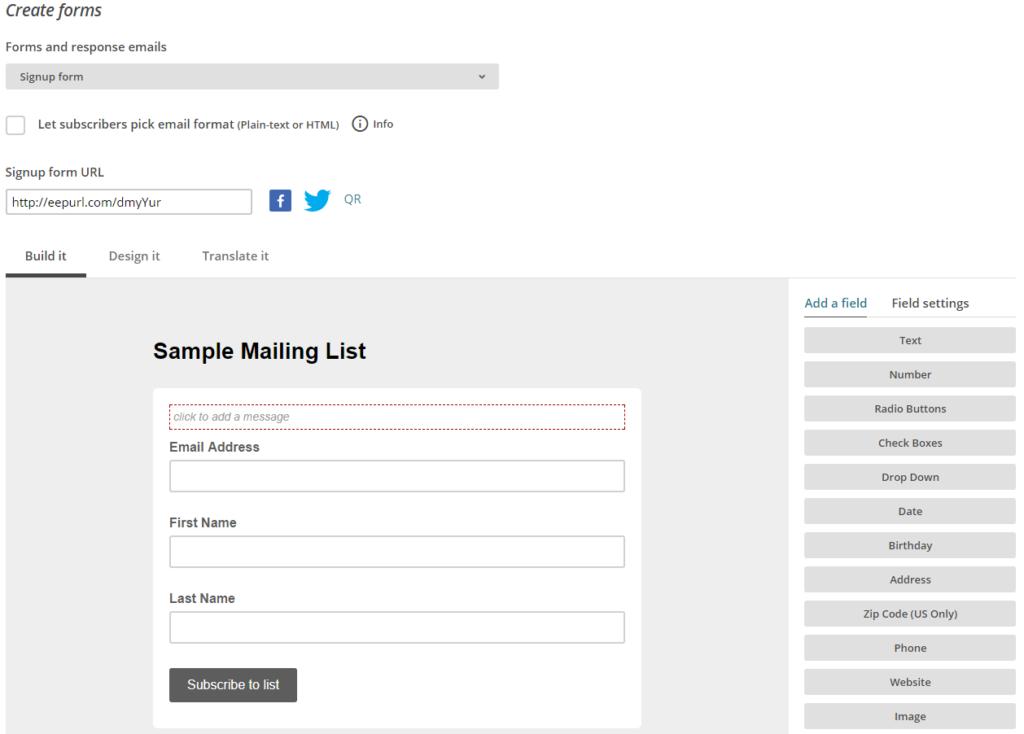
MailChimp lets you create your own landing pages. You can create forms hosted by MailChimp and you can also get HTML code which you can put on your own website. I’ve used both, but I’ll stick to MailChimp’s basic forms since teaching you how to use custom ones requires you to know HTML. You can learn HTML on W3Schools for free – I used it in my teens and it’s still alive and well.

Click Signup forms. Click Select next to General forms. You can customize a whole bunch of forms, but we’re just going to talk about the Signup form itself since that’s the one you want to get absolutely right. This form will double as your landing page unless you decide to make a custom one and use Mailchimp’s HTML code on your own website.

Customize Your Landing Page

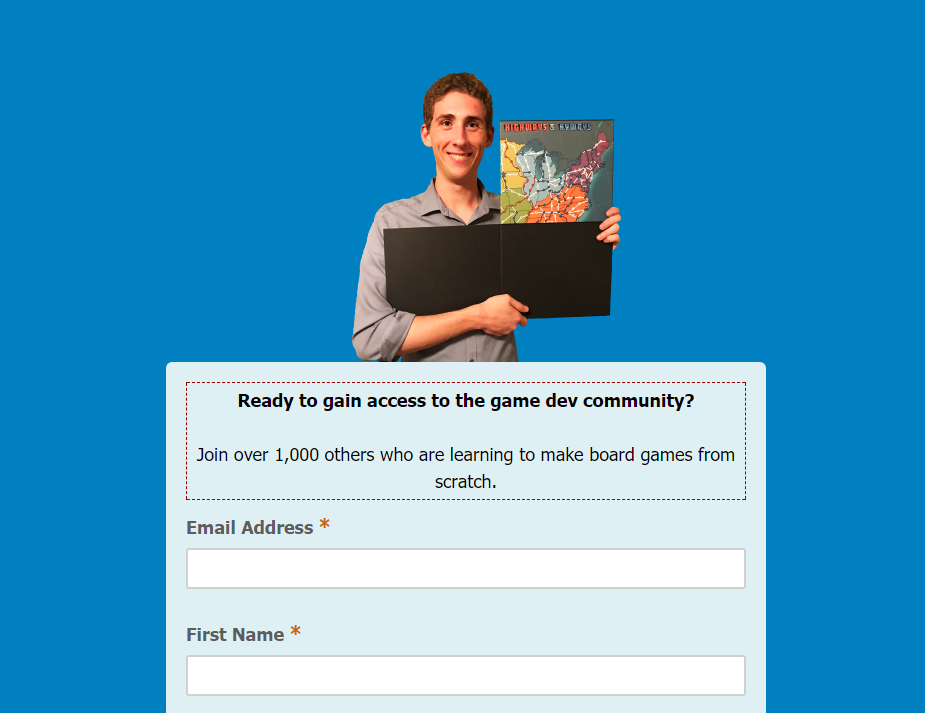
What MailChimp gives you by default isn’t bad, but it’s not pretty either. You can spruce up this form very nicely with a little effort. First things first, though, think about the data you want to gather on your landing page. You need an email address for sure. I recommend gathering at least first name for your merge tags as well. Everything else is extra, so you have to strike this subtle balance. If you ask for too much information, people will drop off your page and not sign up. If you don’t ask for any extra information, it can be hard to segment your mailing list into groups of people with different interests.

Regardless of what you decide to do, click on any fields you need to delete, rename, or relabel – you’ll have options on the right. Click on Add a field and then a button below to add a field asking for more information.

Once you’ve added and removed fields to your taste, click Design it. You can change the colors, fonts, and spacing of every part of your landing page – the page, the body, and the form itself. Click around in there and experiment to your taste. When you’re done, copy the Signup form URL that’s near the top in the screenshot above. That’s your landing page’s address. Share that address anywhere you need to such as your social media or your website.

Here is what my landing page looks like in MailChimp’s editor.

Creating a Template that Works

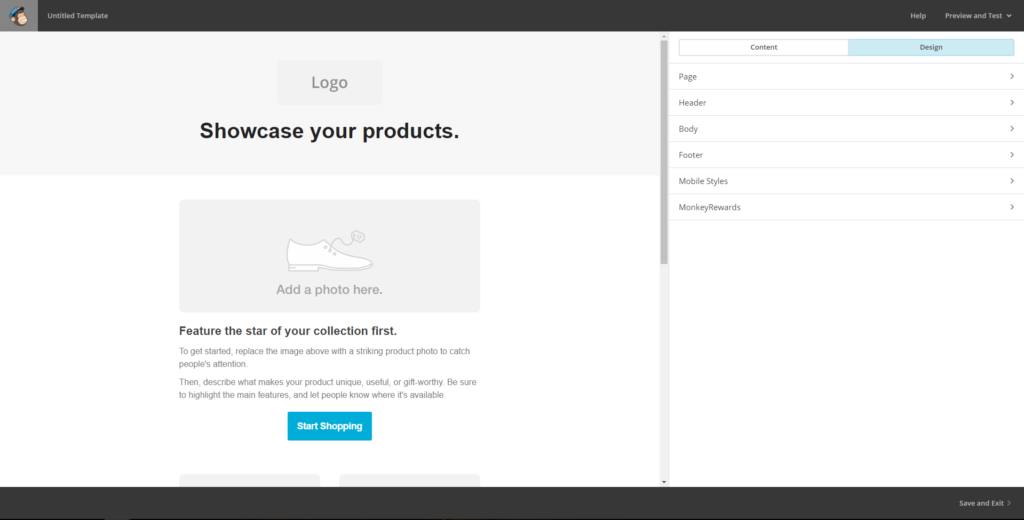
Click Templates then Create a template. I personally recommend that you pick one of Mailchimp’s featured templates and modify it to your tastes. On the right side, click on the Design button – you’ll see items including Page, Header, Body, Footer, Mobile Styles, and Monkey Rewards. You’ll be given lots of options on how to customize the page, such as colors, font sizes, line spacing, and more. I personally recommend staying pretty close to the original design, but swap out the colors for sure. Once you’re happy with the basic colors, fonts, and spacing of your template, click on the Content button to see all the things you can put into your mailer. What you see in the screenshot below can be dragged and dropped right onto your template.

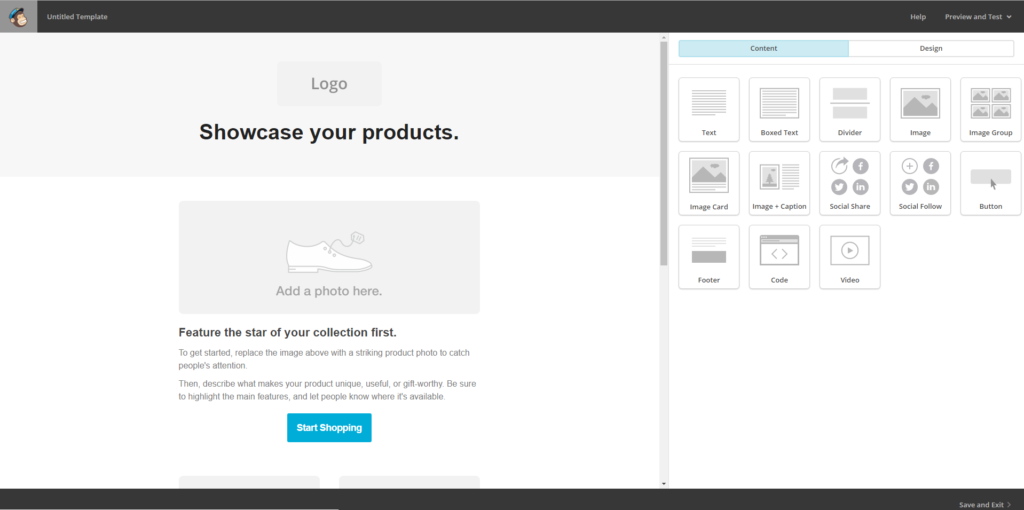
Drag all the elements you like into your template. If you don’t want something in your template, hover over the item and then click on the trash can symbol on the top right. Once you get all your content items in the right locations, click on each one on the left. Then edit the details on the right. Details can be editing an image, updating text, changing where a button goes, and so on. Make sure to click Save & Close any time you make a change on the right side! When think you’ve got a good template, Preview and Test in the top right corner and then Enter preview mode.

This is an example of my newsletter, with the calls to action highlighted in yellow.
Create a Template that Resembles Others

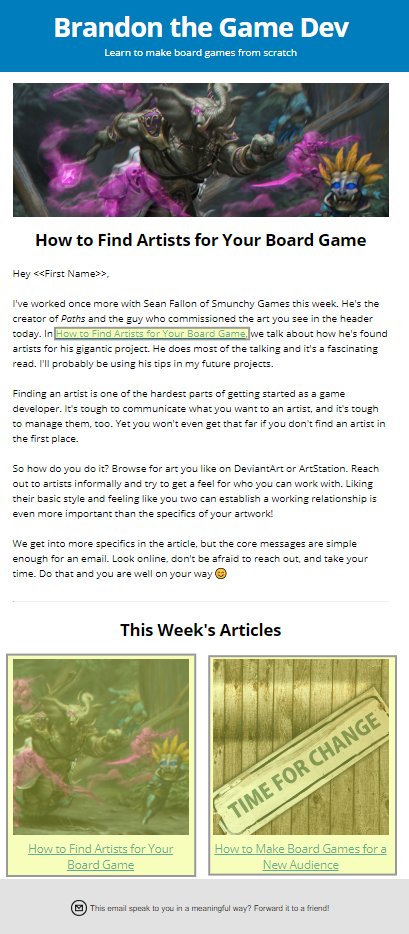
Now the whole time you’re doing this, you need to be looking at newsletters that you like and imitating their style. Pay particularly close attention to their “calls to action” – any articles they want you to read or buttons they want you to click. When you’re sending out your own mailer, you want to have one very clear call to action somewhere on the mailer. If you don’t, it’s pointless to send out in the first place. I personally put three calls to action in each blog email – one text link to an article and two image/text links to an article at the bottom – I’ve highlighted mine in red.

When you’re done with your template, click Save and Exit and give it a name you’ll remember. When you’re sending out email campaigns, you’ll be using your template. You can then swap out text and images and keep a consistent look and feel between all your emails. Go ahead and sign up for your email list and send out a sample campaign to yourself while you’re the only one on it. Make sure everything looks okay and go back and edit your template if it doesn’t.

Building Your Mailing List

Building your mailing list is a great first step, but it can be utterly defeating to put all this work into making a pretty mailer and pretty landing page only to send it to ten people. That’s why you need to think about ways to generate leads for your mailing list. There are a handful of ways to do this.

Create a lead magnet. That’s basically a fancy marketing term for a good reason for a person to give you their email. You could offer a print-and-play version of your game in exchange for an email, create something useful such as a how-to guide, or you could offer people entry into a contest for a free game. I personally use my Discord server of over 1,000 game developers as a lead magnet because I put the invite link on the confirmation page.

No matter how you plan on reaching out to people, creating a lead magnet is essential. Why would anybody give you their personal information without a compelling reason? A lot of people don’t ask this question and therefore get hung up on the fact that people don’t want to give up their email addresses. You have to give them a good reason before you do anything else.

Link your landing page to your website and social media. Most of the time, my pinned tweets and Facebook posts go to my mailing lists. The same applies to the home pages of most of my websites, which usually contain a catchy line such as “Learn to make board games from scratch. Join my community of over 1,000 game developers, artists, and passionate creators.” Then right below that, I put a big, bright button that goes to my landing page.

Direct messages. Everything I’ve said above is great for passive outreach, but let’s assume you want to play hardball. If you have a social media following on Twitter or Instagram, you can send out personalized direct messages to each of your followers. Say something like “Hi (Name), I saw that you’re interested in (thing that’s relevant to your business). I’m offering (lead magnet). Is this something you’d be interested in?” If they say yes, send them the link and tell them what they need to do next, such as sign up and gain access to the lead magnet on the confirmation page.

Help content creators. I’ve talked about Why and How to Get Featured on Board Game Blogs and Podcasts. One of the best reasons to do that is because you can ask them to link to your landing page. You can often see this in the first or last paragraph of guest posts on your favorite blogs or in the show notes of podcasts you like. This is really solid way of growing your audience for free.

Do giveaway contests. Feeling a little more spendy? The absolute best way I’ve found of generating email lists is by offering something for free on Facebook in exchange for an email sign up. Just create a post like this, take out $20 in targeted ads, and watch the emails roll in.

Advertise. Last but not least, one of the best ways to passively bring in email leads with nearly no effort is to take out a Facebook ad. Target your audience very specifically by age, location, and especially interest. Keep an eye on it and make sure you’re not paying more than a dollar per email sign-up. You can read more about Facebook advertising in my previous post, How to Build up a Facebook Page as a Board Game Dev.


Mailing lists are pretty amazing for businesses. I hope this guide gives you what you need to get started. Come up with something to say, make a pretty landing page, make a professional email template, and bring in sign-ups using the methods I’ve described above. Monitor your metrics and experiment until you find something that works.

As always, feel free to ask questions below 🙂

How to Live-Stream Board Games

Posted on 1 CommentPosted in Start to Finish

In the last few years, live-streaming has skyrocketed in popularity. Through live-streaming, we can share videos of ourselves and our screens with a greater audience, who can communicate with us through chat. It’s tempting to think that the analog nature of board games would preclude live-streaming, but this is not the case. Live-streaming board games can be done with digital tools such as Tabletop Simulator or video cameras capturing gameplay on the physical tabletop. No matter how you choose to do it, live-streaming can be a great way to build an audience and share your game with the world.

Need help on your board game?
Looking for more resources to help you on your board game design journey?

To help you understand how to put on a great show for your fans, I’ve brought in Will Esgro of Happy Fun Time LIVE. He’s an up-and-coming board game live streamer I’ve worked with in the recent past. He knows how to put on a good show!

We interviewed via Discord direct messages which have been lightly edited for clarity and flow. This interview is broken into six parts:

  1. Who is Will Esgro?
  2. Why watch streams?
  3. Why stream games?
  4. What are the technical requirements?
  5. How do you build a community?
  6. Parting advice

Who is Will Esgro?

Brandon: Thank you so much for agreeing to interview with me for the blog! This is going to be a good one – I hear a lot of questions about live-streaming board games.

To get started, tell me about yourself and Happy Fun Time LIVE.

Will: Thanks for reaching out and for providing an outlet to share my experiences.

I’ve been involved in gaming since the age of six when I got my Nintendo. I’ve always tinkered in technology and I often pour myself into side projects when I get bored. Streaming started as one of these “distraction” projects.

I got involved in Twitch streaming when it was migrating from JustinTV, which was basically a platform where people could stream media over the internet and talk about it while watching. I was using my online handle wesgro2. I’d stream Kerbal Space Program, Day Z, and Mech Warrior Online.

After my wife and I received our amazing son 2 years ago, we made the joint decision that I would stay at home with him. Originally, I worked part-time for about a year during the transition. While this was all happening, I started having friends over often to play board games.

I stumbled into Kickstarter, where I noticed some of the most innovative and exciting games were being launched, and this led me to find content creators on YouTube and Twitch. Everything sort of clicked after that.

Brandon: And you’ve been streaming for roughly a year now?

Will: Under the new Happy Fun Time LIVE brand, yes.

Brandon: For those unfamiliar, this is the Twitch channel where you do play-throughs and interviews with the creators of new games.

(Which is a lot of fun for the creator, I might add.)

Why watch streams?

Brandon: With all this in mind, what is the appeal of streaming board games for the viewers? Why do people watch?

Will: I think our core viewers watch and participate in streams to replicate the experience of playing with a regular gaming group. Not many rural or suburban areas of the US or world have places where you can meet up with fellow gamers and just play. It’s unfortunate, but many local game stores in or around small towns devote their resources and space to Magic and Warhammer players. Board games are often overlooked. I don’t blame them because often those are the only returning customers to their stores.

Others will pop in to check out a game they may have been interested in.

I like to ask people ahead of our streams what they want us to play.

Our best night in terms of views are on the nights where I’m just relaxed and having a good time with the guests and our chat.

Brandon: Vicarious experience is a big part of what makes streams work, though having a community is probably bigger. People can respond to you, and you to them in real time.

Having streamed several games, I have to say that it feels like doing small-town radio. You can really connect with your audience in a way that blogging, video, podcasts, etc. don’t allow you to do.

Why stream games?

Brandon: What is the appeal of streaming board games for the creators?

Will: I think the biggest appeal for me was that we are in a board game boom right now. The pool of content creators is small but growing pretty rapidly. I wanted to get in on the ground floor and ride the wave.

I think each creator has their own reasons and influences. Mine were that I like board games and the opportunity to grow in that area of Twitch streaming is exponential as opposed to mainstream gaming which is already gobbled up by too many mainstream streamers.

I’m also planning on streaming some figure painting as I learn the process.

Brandon: For you, it gives you a chance to see new games before they’re out.

For game developers, I’ve noticed that streams are a really good way to spread the word about games. This is especially true since they’re often recorded and saved online for later viewings.

If you’ve got a live Kickstarter campaign and a compelling game, it’s not hard to pull viewers from the stream to your campaign either. I did that with War Co. and made thousands of dollars that way.

Will: And vice versa, we often get new viewers and sometimes strong community members through partnering with designers to promote their games.

Brandon: That’s true, game makers tend to have their own audiences which in turn make yours bigger for later streams with other creators.

What are the technical requirements?

Brandon: What’s involved in streaming from a technical perspective?

Will: I use Streamlabs OBS. It’s free, robust software that is only limited by your imagination when streaming. I just started using a new bot called GatherBot which interacts with viewers while we stream. There is a quest mode that lets people in chat take on different quests in chat to earn rewards. I’ve been loving it.

Hardware is the tough part. We use between 2 and 3 webcams for our live board game play, which is a challenge since I have to take it all down and set it all up each week.

Monday and Wednesday stream setups are easy because I just play video games or invite community members to play Tabletop Simulator or Tabletopia games with me.

Will: That is the Friday table.

Will: And that’s for Mondays and Wednesdays.

Brandon: Would you say you need a special computer to run streams, or can you work with a simple office desktop (or even laptop)?

Will: For board games, you’ll need a decent processor, RAM, and graphics.

Technically, you could get away with using a cell phone, but it may fall flat due to lack of scene changes and no great way to show the board and players at the same time.

I suggest at least an i5 processor, 16 GB of RAM, and a 900 series Nvidia graphic card or equal AMD tech level hardware.

Brandon: The bravest among us may even wish to make their own PCs using parts they get from Amazon.

Will: I’ve been building my PCs for the last 15 years. 🙂

Brandon: Using sites like PC Part Picker and YouTube tutorials as guides. Helps you make a really great computer for a much lower price. I use a home-assembled PC for Pangea Games too. Five hundred bucks in parts and still lightning fast after three years.

Will: Yep.

Will: I still mainly use NewEgg and TigerDirect.

How do you build a community?

Brandon: Once you have all the supplies, how does streaming work socially? How do you engage viewers and maintain a community?

Will: It all starts with your offline friends. Ask them if they want to be a part of it and ask them for feedback. If they don’t enjoy watching you or supporting you, that’s your first sign that something isn’t working.

Start various social media accounts to promote when you stream, then start following and engaging members of the community you would like to grow in.

I suggest Twitter as a primary way to reach out and Reddit as a secondary one. Those seem to have the most traction in cultivating an effective and engaging community.

You also have to commit to at least 10 to 20 hours of watching other content creators and genuinely supporting them. Parallel growth with other streamers is a large part of the initial process.

Start running giveaways. I take about half of what I generate monthly and apply it to prize support for our viewers and subscribers.

I run a monthly giveaway of $40 – 50 in value. Then I run smaller giveaways each time we hit $50 worth of bits on our channel. The monthly is run through Gleam.io which is a great tool for growing each of your social media accounts and media channels symmetrically.

Brandon: That first part is important but easy to miss: make sure you’re able to engage your friends first. Then social media, giveaways, getting involved in the community, and finding peers are all really good ideas.

Will: I now have about 500 followers on each account and our channel.

The really crappy part of streaming is casting.

Brandon: Casting?

Will: Some people are not great in front of a camera. That includes friends and community members.

Brandon: That’s true. Some folks just aren’t telegenic – through no fault of their own.

Will: You have to be ready to have serious conversations with people as you grow regarding how they fit.

This is very challenging and it could temporarily stifle your growth if they don’t take it well.

You also have to develop a sense of who will be right for each game you choose to play on stream.

If you have a goofy friend who is always cracking a joke, they might not be as great for a very involved 4x or Euro game.

They may distract too much from the gameplay and ruin the experience and frustrate you while you’re live.

Will: Same goes for someone who pays lighthearted games too seriously. It takes away from the experience.

The funny thing is I think we all have that friend who shows up for some game nights that we wish we could politely ask not to join in the future when playing a certain game. Like when Grandma used to always flip the table during Monopoly.

I actually have to have those conversations though, and it sucks.

Brandon: Flipping the table after the first turn of Monopoly is a house rule where I live.

It’s true, though, you often have to have uncomfortable conversations with people when doing public-facing entertainment. That’s never easy.

It is, after all, a light version of show business.

Parting advice

Brandon: Okay, one last question.

If there were one piece of advice which you could give yourself before you started streaming, what would it be?

Will: That is a tough one. Streaming is a long experiment until you “make it”. I don’t think I’m at that level yet. Once I’m there, I think I could better reflect and let you know what I did to get there, and what formula clicked.

For now, I’m just happy to have a core group of about a dozen viewers who hang out each night I stream.

Brandon: That’s a good attitude to have. Building an audience from scratch is a long, slow process that gets easier only after a lot of time.

That’s all I’ve got. Thank you very much!


Live-streaming board games is becoming more popular as time goes on. It’s a great way to share your games and engage your community. Have you ever streamed a game? Would you like to? Let us know in the comments below 🙂

August 2020 Update

Because of the coronavirus pandemic of 2020, a lot of people cannot go to conventions, local game stores, or even their friends’ houses to play board games. Love of gaming can’t be quashed by a virus, though. If you want to watch some live-streaming board gamers, the top 10 most popular shows at the time this update is being published are:

  1. FFGLive
  2. Shut Up & Sit Down
  3. BoardGameGeekTV
  4. AnalisisParalisis
  5. GoldSquadronPodcast
  6. TheBrothersMurph
  7. BigPotatoGamesTV
  8. LederGamesMedia
  9. VttvLive
  10. Deagal_Remyr


How to Create Board Game Specs and Files for Your Printer

Posted on 14 CommentsPosted in Start to Finish

Board game development is a very individual process. Every single developer has different methods for creating their games. This article is the fourteenth of a 19-part suite on board game design and development.

Need help on your board game?
Looking for more resources to help you on your board game design journey?

In this article, I will be talking about how you create instructions that will allow manufacturers to create your game as a physical product. Creating technical specs can be a complicated task. You need to choose the right materials, understand the basics of board game manufacturing, and meet legal and distribution requirements. Once you understand all that and agree on specs with your desired printer, you will then need to make files according to their standards. It’s a lot to take in.

For context, I’d like to carefully define what board game specs are for. When you’re creating a game that prints more than a few copies, you’ll need to ask a special kind of company to manufacture your game. These companies use what’s called offset printing – basically the method by which more than 500 games can be cost-effectively printed. Most of the ones I know of are based in China, so you want to create very, very detailed specifications that you can send to the printers. If your specs are good, you are likely to get a good product in massive quantities for a low price.

As an example, see the Highways & Byways specs in the following paragraphs. I sent these out to a handful of offset printers to receive a quote.

Board Box Specs, 12.5 in. x 10.5 in. x 2 in. (318mm  x 267mm x 51mm)

1 Board Box 12.5 in. x 10.5 in. x 2 in. (to fit quad-fold board)

Material: 1.2mm premium white lined chipboard wrapped with 128 gsm art paper

Finish: Water-proof matte laminated smooth finish

Printing: 4C/0C

Board, 24 in. x 20 in. (610mm x 508mm)

Fold: Quad-fold

Material: 1.8mm chipboard wrapped with 128gsm embossed texture art paper

Finish: Water-proof matte laminated smooth finish

Printing: 4C/0C

Rules, A4 Size or similar, 8.27″X11.7″(210.058mmX297.18mm)

8 pages

Saddle-sewn

Material: 78 lb (115 gsm) art paper

Printing: 4C/4C

Finish: Water varnish

Punchboard, 9”x9” (228.6 mm x 228.6mm) with 48 tiles

48: circular, .5” x .5” (12.7 mm x 12.7 mm)

Material: 12pt C1S + 1mm chipboard + 12pt C1S

Finish: Gloss laminated (smooth finish)

Thickness: 2.5mm

Printing: 4C/0C

House Pieces, 4

Purple, 1

Green, 1

Blue, 1

White, 1

Pawns, 4

Purple, 1

Green, 1

Blue, 1

White, 1

129 Poker Size Cards, 2.5” x 3.5” (63mm x 88mm)

Material: 300 gsm blue core card stock

Finish: Matte (smooth finish)

Printing: Fullcolor, both sides

6 Tarot Size Cards, 2.75” x 4.75” (70mm x 121mm)

Material: 300 gsm blue core card stock

Finish: Matte (smooth finish)

Printing: Fullcolor, both sides

Bag or Bags

Determine case-by-case by manufacturer

I need something but I want to see what’s available and cost effective for holding the punchboard tiles, house pieces, and car pieces.

This guide comes in four parts:

  • Choosing Materials
  • Printing Basics
  • Legalese and Distribution
  • Preparing Print Files

Choosing Materials

Before you contact any manufacturers, you need to have a good idea of what parts your board game will need. Parts include boxes, cards, boards, tiles, punchout tokens, wooden and plastic pieces, instruction manuals, and more. Imagine your board game as a complete product – when you open the box for the first time, what comes out? Make sure you think of everything!

You can use websites like Board Games Maker, The Game Crafter, and Make Playing Cards to help you get an idea of what materials you will need. These sites also provide good quality prototypes and specs that you can pass on to printers who will do bigger print runs. I do not recommend using these sites for anything other than prototyping.

To illustrate my point, I’ve included the above screenshot of Board Games Maker’s website. I used this site to help create Highways & Byways specifications. I selected a board which matches the size I want for my game board. Then I looked at the bottom left where it says Specifications for a lot of useful information, including: dimensions (imperial and metric units), material, finishing, thickness, and printing (4C/0C). Let’s break that down a little bit.

  • Dimensions – Every single part you include in your game should have its size specified in both imperial and metric units.
  • Material – You can copy and paste this directly to describe what you’re looking for to your printer.
  • Finishing – Gloss means shiny, matte is a dull luster. Either one can be pretty, but I went with a matte board so that the gloss finish pieces would stick out more. You can choose between smooth and linen finish as well – linen is nicer, but more expensive, making it a good goal for Kickstarter.
  • Thickness – You should always describe thickness of materials to your printer.
  • Printing – This describes how many colors will be used on each side. For most cards, it would be 4C/4C – full color on both sides. For this board, since it’s only printed on one side, it’s 4C/0C.

You can use a similar method to find specs for just about any component you can imagine: boxes, cards, boards, tiles, tuckboxes, dice, booklets – you name it. Either Board Games Maker or The Game Crafter will be able to help you find hard specs.

Printing Basics

After you create the initial specs and it’s time to print, you’ll need to make files for your printer to use for printing. This can get really complicated since each manufacturer has their own templates and standards. They’re pretty similar, though. I’ll tell you what I know to help save you time.

When you’re creating files for printers, there are a few constant rules that you always need to follow:

Always use 300 dpi resolution or higher. Any less than that and you run the risk of getting fuzzy images and low-quality printing. It’s not pretty.

Always use the correct file sizes specified by your printer. Board Games Maker provides pretty good templates that you can use that will work for most printers, but you may need to change some things up by hand.

Always respect the bleed, trim, and safe zones. Anything that you print might print slightly off center if parts of the printing machines are misaligned. Anything in the safe zone on your template will always get printed, the trim line is where it’s supposed to be cut, and the bleed line contains everything that could potentially get printed if the machines are misaligned.

Always use CMYK instead of RGB colors. RGB colors are made for computer screens, CMYK is made for printing. Computers can show more colors than printers can print. There’s a lot of cool physics involved that explain why this is, but I’d have a hard time explaining it on this blog.

Always use rich black instead of true black. Colors in CMYK printing are represented by giving a number to each letter in CMYK: cyan, magenta, yellow, and black (K). You might think that C 0 / M 0 / Y 0 / K 100 would print pure black, but it simply doesn’t. It just comes out as a nasty sort of dark gray. To get true black, you’ll need something like C 40 / M 40 / Y 40 / K 100.

Each number in CMYK essentially represents instructions on how much ink to put on a spot on paper. How much ink goes on each spot is called “ink coverage.” You can make real messes with ink coverage if you’re not careful. If all the numbers in the colors add up to be over 300 (or in some cases lower than that), the ink can run. You need to make sure not to exceed 300% ink coverage for every color in your game.

Legalese and Distribution

While your printer will print more or less anything you give them, there are certain legal and distribution requirements that you will want to meet. Real quick: I’m not a lawyer, so double check everything I say with other sources to make sure you’re getting the most up-to-date and accurate advice.

Barcode: If you create a game that you intend to sell in any kind of store, you need a GS1 UPC-A barcode. You can buy these online for relatively cheap on websites like Buy A Barcode. Always follow reccomended guidelines on the print size of the barcode – if it’s too small, it won’t scan.

Don’t try to go super cheap on barcodes! If you buy one and it’s not actually registered with the barcode regulating organization, GS1, then you might run the risk of your barcode being the same as someone else’s. That could lead to your products getting pulled off online stores or even out of physical stores. It just creates a huge headache for the people handling your logistics.

“Made in China”: If you make a game in China, as many do, your box has to say “Made in China” on it somewhere. This is a legal requirement.

Age Restrictions: Have you ever noticed that most modern games have “14+” on the box? There’s a good reason for that. There are special legal requirements that affect games created for children under the age of 14. If your game is truly for children 14 and older, then you won’t have to meet them.

In the case of games for children, but not exceptionally young ones under the age of 4, you’ll need to meet a few additional requirements:

  • Your game will need to be safety tested. This costs hundreds of dollars, maybe even a thousand or two for each batch. The cost of meeting international regulations sucks, but not as much as children getting toys with toxic ink or flammable parts. Be a good citizen, get your stuff safety tested if it’s for kids. Otherwise, it can get tied up in customs, or worse.
  • Once your game is safety tested, then you can put the “CE” label on the box, which means it’s compliant with relevant European Union standards. (The relevant standards for board games are often EN-71-1, EN-71-2, and EN-71-3, but make sure to do your own homework on this.)
  • You’ll need to put a “No 0-3” label to indicate your product is not intended for babies.
  • Finally, if your game has small parts, you’ll need to put a “choking hazard” on the box.

All together, that looks a little something like the following image, except with a barcode where there is currently an empty white space. (I haven’t bought the barcode yet.)

Preparing Print Files

Each print file that you prepare for your printer will use a template specifically designed for the components you’re including. I can’t really help you create those templates, you need to find them using the resources I’ve provided. I do, however, have some advice for certain types of components.

For cards, pick a size and find the template on Make Playing Cards. Figure out how many cards are on a sheet and try to print on the fewest sheets possible to decrease cost.

For game boards, figure out where the folds are and adjust art as you need to.

For booklets, choose the number of pages and go with saddle-stitching. You can also get perfect binding, spiral binding, and casewrap binding. However, unless your rulebook is Ulysses by James Joyce, you’ll probably only need saddle-stitched.

When making punchboard pieces, you have to include bleed on each piece. You can’t usually make pieces smaller than 6mm, and even if you could, you probably shouldn’t because they’d get fiddly fast. Punchboards can get expensive, so try to fit everything on one or two boards. Use thicker pieces, like 2.5mm instead of 1.8mm – they are so much easier for players to pick up and use.

For meeples and other pieces, ask your printer what is available. Use The Games Crafter to find the parts you like and ask for ones like that. Providing specific examples makes life easier for your manufacturers.

When it comes to bags and inserts, it’s always nice to include them. Players really appreciate it.

Miniatures require their own 3-D models – I don’t know much about this. I know that the set-up cost is really high, but people are very enthusiastic about miniatures in tabletop games. If you plan on making miniatures, you need to find a good 3-D modeler and prepare for a large print run.

Deciding How Much to Spend

It won’t take you long to realize that the materials that go into your board game will determine the cost to manufacture it. Knowing exactly how much you can afford to spend per unit is difficult, and it’s something I talk about in-depth in this post.


It can be difficult to take the products we imagine in our heads and describe them in enough detail for people halfway around the world to make them a physical reality. It is a necessary skill, however, and I hope that this article has provided you with enough context to get started. If you have any specific questions, please ask below in the comments, I’d love to help 🙂